For my garment of the week I've chosen a vintage pattern from the 1950s for a gorgeous little wiggle dress with side button detail, raglan sleeves and a matching stole.

The Pattern
As far as I have been able to tell, this pattern is actually pretty rare and doesn't appear in the vintage pattern wiki but, from the style and drawing I think it is early 50s.

A beautiful wiggle dress, it has soooooo many darts. Six fish eye darts and bust darts on the front, another six fish eye darts on the back and three in each sleeve. This is not unusual for 40s and 50s dresses. Home stitchers were more skilled and designs were more complex. All these darts are going to give a beautiful shape that you wouldnt get with just a dart in each panel - the more and smaller the darts the more precise and curvier shape you can achieve.

To preserve the pattern for the future, I'm going to trace the piece on to dot and cross paper. I actually trace all of my patterns - it's far easier to make alterations, is less fragile and saves the pattern.
The Fabric
I've chosen to make the dress out of a 100% wool tweed that I found in one of the Walthamstow shops for far too cheap a price for British made wool.

All the stripes mean it's going to be a pain to pattern match but, when it's done, it's going to look great.
The Toile
I'm not usually one to toile a dress for myself (professionally I do it for almost every new project) but it's nice fabric and I don't want to waste it.
A toile is a test garment to check fit and make any alterations before making the final garment. I use a medium-ish weight calico. I draw all over it in biro marking darts, the centre front, the waist, the hem, matching points and notches. After it can either be recycled, kept as a pattern or, what I'm doing on this occasion, and using it as an interlining.
The standard alterations I make to patterns are:
- A sway back adjustment. As I have a generous booty it can make your back shorter so I end up taking a chunk out of the centre back of the bodice, down to nothing at the side seams. This dress doesn't have a waist seam so I can't do this adjustment after I've cut the fabric.
- Adding more space into upper sleeves. My upper arms are larger than the standard so I slash the pattern and add some volume to the upper arm section without disturbing the sleeve head or length.
Before making the toile I decided to sew the body of the garment as is but add the extra into the sleeves.
As you can see I need more space in the hips. It is making the dress ride up, is creating a ton of wrinkles and just looks painful. However once this is done I won't need a sway back adjustment as the back panel actually hits and hugs my waist nicely.
I don't need the extra space in the upper arm either. It's making it look baggy and untidy and the aim of this garment is to look sharp and tailored.
The Construction
The great thing about having the toile to use as my pattern is I can now cut on a single layer instead of the fold. This means I can minimise wastage and ensure that the pattern matches across as many seams as possible. To save my brain I decided to match just the horizontal lines instead of the vertical as well whilst going around the body but matching the vertical through the collar.

I cut the front and back panels first then basted the toile to the wool. First the center-front and waistline, then through the center of all the darts, then all round the edges of the panels working from top to bottom. This is kind of a light version of basting. If you wanted to be extra thorough you could thread trace all the legs of your darts, extra lines down the panel and across and then baste the darts together before sewing on the machine. In order for me to able to finish this in time whilst home schooling, shopping and everything else I decided to forego those steps.
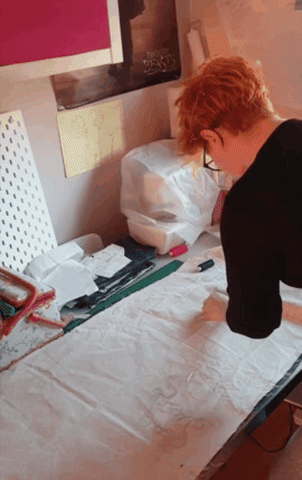
Here's a cool little gif of me basting the center front (always know and mark where your center front is) and the waist line. AND before any cheeky git comments on the bowl like nature of my haircut 1, I had it cut by a pro the week before quarantine 2, this is the first time I've seen it like this and I had no idea but 3, #trendsetter
Matching round the body was the easy part - put the hem on a horizontal line and pretty much bingo. The sleeves were a trickier part. I did this by pinning the toile to the body and marking the horizontal lines. When I put it on the fabric I couldn't get it to match every single line, with the shapes it was never going to happen but I found the ones I could live with and went from there. Same for the other side of the sleeve but then also attempting to balance it across the shoulder as well. I make it sound a lot easier then potentially it is but practice makes perfect at seeing where the lines are going to intersect and which ones look pleasing to you.
Beautiful bound button holes which I am actually glad of as my machine can be exceptionally frustrating at sewing button holes. These buttons are from the button shed and are vintage beauties. Large ornate shiny buttons for the front and collar and smaller, slightly less shiny grey buttons for the sleeves.

A lot of the construction from there is unremarkable. Due to the work cutting out matching the seams whilst sewing was easy peasy. All seams were sewn by machine but all the finishing was done by hand. All the facings hand stitched down, the seam allowances on the collar stitched down ready for the lining to be hand stitched in, the hem hand stitched. All of these were catch stitched on to the calico and not all the way through to the wool. Ready for the lining - which hasn't arrived yet... I've taken photos anyway as from the outside you would never know
The Stole
Included in the design is a pattern for a matching stole with cute little bias cut pockets. I've made that too, but again it doesn't have lining - this time its a bit more obvious... I decided to hand-stitch the pockets on as nowhere else on the dress is there any top-stitching therefore it would look weird here.

The Outcome
If there is one thing the 1950s knew it was how to give women curves and swerves for days. I love the shape this dress gives me without any support wear or corsets or padding. Genius. Obviously this is the hottest day of the year so far and I am a little bit warm... Clearly an autumn/winter dress but perfect for business meetings at the club or dinner and the theatre.
Let me know what you think!
NEXT WEEK
Drafting a 1940s waistcoat from scratch